
In Part 3, we built an authenticated MCP server that calls Microsoft Graph using On-Behalf-Of (OBO).
In this post, you’ll connect that Message Center MCP server to a Copilot declarative agent that you build with the Microsoft 365 Agents Toolkit.
This is the “enterprise path” integration:
- Your declarative agent calls your MCP server.
- The agent authenticates the signed-in user (delegated OAuth).
- Your MCP server performs OBO token exchangeto obtain a Microsoft Graph token.
- The MCP tool runs as the signed-in user and returns results.
Integrating the Message Center MCP server
This server implements the MCP protocol and exposes a tool that retrieves Message Center posts from Microsoft Graph. It includes OBO (on-behalf-of) authentication so that it can call Graph on behalf of the signed-in user.
Message Center MCP server repo (reference implementation used in this series):
Key details (as described in Part 3):
- Health:
GET /healthz - MCP endpoint:
POST /mcp(JSON-RPC 2.0) - Discovery:
GET /discoverandGET /.well-known/openid-configuration - OAuth proxy endpoints:
GET /authorizeandPOST /token - Tool:
getMessages- Queries Microsoft Graph:
GET https://graph.microsoft.com/v1.0/admin/serviceAnnouncement/messages
- Queries Microsoft Graph:
Prerequisites
You’ll need:
- Microsoft 365 Copilot available in your tenant (and access to test in https://m365.cloud.microsoft/chat)
- Visual Studio Code
- Microsoft 365 Agents Toolkit extension installed in VS Code
ℹ️ Important
The Message Center MCP server must be running locally or hosted (Part 3 walks through local setup). This post assumes it is already running and reachable.
- A public HTTPS URL for the MCP server
- If running locally, use a tunneling service (Dev Tunnel, Cloudflare Tunnel, etc.) - more on that below
- A Microsoft Entra app registration configured for the Message Center MCP server (Part 3)
- A test user with the right Microsoft 365 role to read Message Center (for example, Message Center Reader)
Create and configure an Entra app registration for the MCP server
For the purposes of this blog post we only need the server Application registration. In the next part of the series we will integrate this server with a client and at that time we will register the client application registration.
Run the client app registration script:
ℹ️ Note
Before running this script, ensure you have created the server app registration as described in Part 3 and have the Server App ClientId available.
| |
Note the output values: ClientId, TenantId, ClientSecret. You’ll need them when configuring the agent in the Agents Toolkit.
Minimum configuration recap (as completed in CreateClientAppRegMCP.ps1):
- Authentication redirect URIs
- Add the redirect URI your Copilot Studio connection uses :
- https://teams.microsoft.com/api/platform/v1.0/oAuthRedirect
- https://localhost:8080
- Copilot gets an access token from this client app registration.
- The token audience is your MCP server API (example:
api://<server app reg clientId>). - The MCP server uses OBO to exchange this token for a Graph token.
Step 2 — Decide where the MCP server will run
Microsoft 365 must be able to reach:
https://<your-host>/mcphttps://<your-host>/authorizehttps://<your-host>/tokenhttps://<your-host>/.well-known/openid-configuration(or/discover)
Two common options:
Option A: Local server + tunnel (quick dev)
- Start the server locally (default port in Part 3 examples is
8080). - Expose it with a tunnel.
Example with Dev Tunnel:
| |
Also see,
scripts\dev-tunnel-persist.ps1in the server repo to create a persistent Dev Tunnel.
Note the public HTTPS URL (example: https://<something>.devtunnels.ms).
Option B: Hosted URL (recommended for stable testing / production)
❗ The steps for hosting the server are outside the scope of this post. However they are documented in the server repo README.
Step 3 — Validate the server with curl
Set a base URL:
| |
3a) Health check
| |
You want 200 OK and {“ok”:true} responses.
If that succeeds, your server is reachable via a public URL.
Step 4 — Create the declarative agent project (Microsoft 365 Agents Toolkit)
This post assumes you’re using Microsoft 365 Agents Toolkit to build and provision a declarative agent.
- In Visual Studio Code, open the Microsoft 365 Agents Toolkit extension.
- Select Create a New Agent/App.
- Choose Declarative Agent.
- Choose the following starting point:
- Add an action
- Choose ‘Start with an MCP Server Preview’.
- Enter the your local-tunnel/hosted MCP server URL with ‘/mcp’. (for example:
https://<your-host>/mcp). - Select a destination folder for your project.
- Enter a project name (for example:
Message Center Agent - MCP).
A new instance of VS Code will open with your new project.
- Name the app (for example:
Message Center Assistant). - When the new project opens, locate your app manifest file (commonly
appPackage/manifest.jsonin Agents Toolkit projects).
You see the following prompts from the toolkit regarding the MCP server:
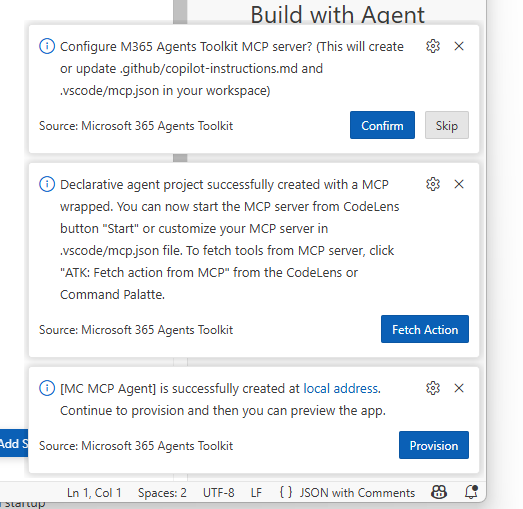
Click ‘Confirm’ to add the Copilot instructions for the Agents Toolkit MCP server.
Click ‘Fetch Action’ to fetch the tools from your MCP server.
Select the first option, showing the URL to the MCP server.
If you get an error, in
mcp.json, click ‘Start’ the connect with the MCP server.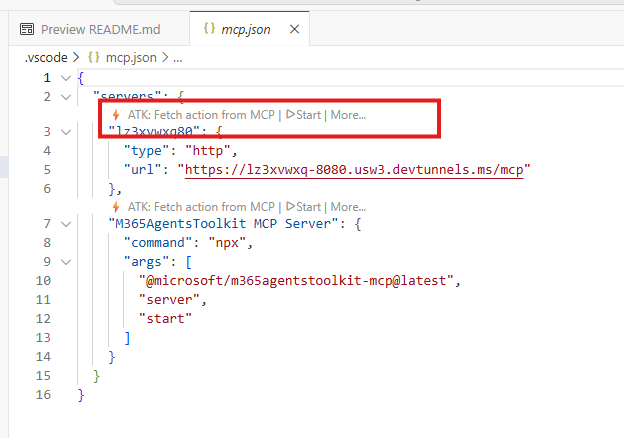
Then click “ATK: Fetch Actions from MCP Server”.
At the prompt ‘Select the action manifest you want to update’, Click on the ‘ai-plugin.json’.
Click on ‘getMessages’ to add the Message Center tool to your agent.
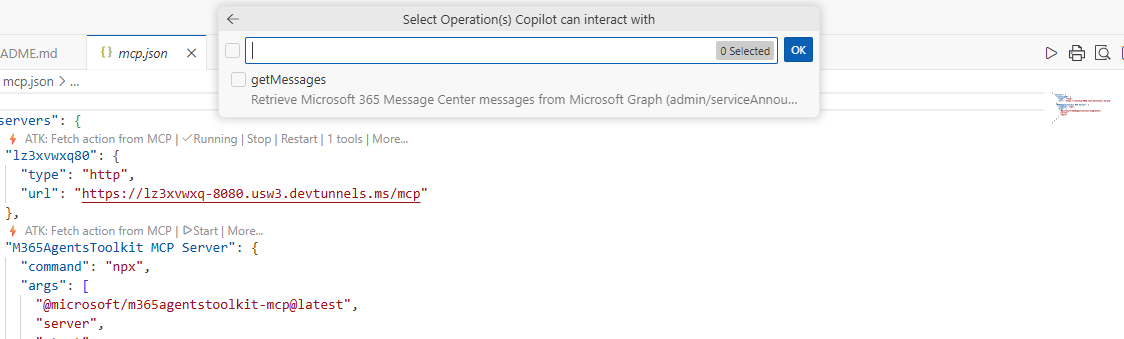
Click ‘OK’ to confirm adding the tool.
Do not click on ‘Provision’ yet.
At this point, you have a declarative agent project with the Message Center MCP server tool added. However, the agent can’t connect to the MCP server yet because authentication isn’t configured. This requires registering the client app registration with the Teams Developer portal. This provides a opaque ID that will be used to connect the agent to the MCP server using OAuth. This step stores the client app ID and client secret In the Teams developer portal. This provides a secure a way to secure the client app ID and secret.
Step 5 — Register the agent in the Teams Developer Portal
For this step you’ll the client ID and client secret created above. You’ll also need the server app registration ID created in Part 3.
Open the Teams Developer Portal. Roles required: Teams app develop or Teams Administrator or Global Administrator.
Click Tools
Click ‘OAuth client Registration’. You may be prompted to select the previous version of the portal.
click ‘New OAuth client registration’.
Fill in the following fields:
Registration name Any descriptive name (internal only).
Example:OAuth-MessageCenterMCP
Base URL The MCP Server Endpoint URL:
https://«your-host»/mcp/
Restrict usage by org
- My organization only → internal use
- Any Microsoft 365 organization → multi-tenant (this setting for testing)
Restrict usage by app
- Any Teams app (testing/validation) for development
- Existing Teams app if binding to a specific App ID
OAuth Settings
Client ID Client ID for agent obtained above
Client secret Client secret for agent obtained above
Authorization endpoint https://login.microsoftonline.com/{tenantID}/oauth2/v2.0/authorize
Token endpoint https://login.microsoftonline.com/{tenantID}/oauth2/v2.0/token
Scope Use the exact scope your API exposes: api://«server app reg clientId»/access_as_user
PKCE
- Keep ON for Authorization Code flow (recommended).
Review all settings and Click Save to create the OAuth client registration.
Copy the generated OAuth Client registration ID (found at the top of the form). You’ll need it in the next step.
Step 6 — Update the plugin manifest to connect to the MCP server
- Return the to Visual Studio Code.
- Open
ai-plugin.jsonin theappPackagefolder of your project.
Change the follow block from this:
| |
To this:
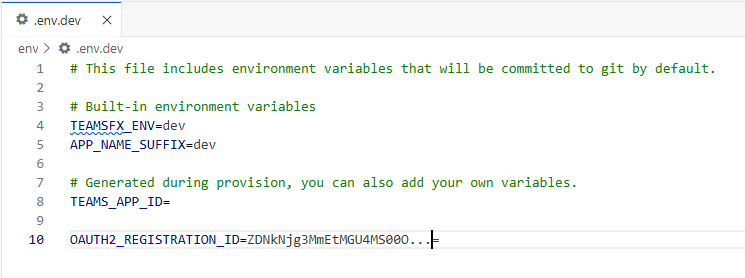
| |
Note the addition of the auth block with the reference_id property. Also, the “mcp_tool_description” has been removed. Make sure you update the ‘spec’, ‘url’ value to your MCP server endpoint. Update .env.dev or .env.production with this variable OAUTH2_REGISTRATION_ID with the actual OAuth Client registration ID obtained from the Teams Developer Portal in the previous step.
Step 5 — Add the function definition to ai-plugin.json
Currently the function definition for getMessages is missing from ai-plugin.json. You need to add it so the agent knows how to call the tool. It is expect this will be added automatically in a future version of the Agents Toolkit.
- Open
ai-plugin.jsonin theappPackagefolder of your project. - Locate the
functionsarray. - Add the
getMessagesfunction definition as follows:
| |
Step 6 — Provision and verify tool discovery
- Save your manifest changes.
- In Agents Toolkit, select Provision again.
- Open https://m365.cloud.microsoft/chat, select your agent, and start a new chat.
What you’re looking for:
- During the first run, you should see a consent/connection experience if OAuth is configured.
- Your MCP server should receive MCP handshake traffic (for example
initialize, thentools/list). - When you ask a Message Center question, your server should receive a
tools/callforgetMessages.
Step 7 — Test the agent end-to-end
In Copilot chat (with your declarative agent selected), try:
- “What changed for Copilot since yesterday?”
- “Find messages related to Microsoft 365 Copilot published in the last 30 days.”
- “Show message regarding updates from the last month that are related to Copilot and marked as major changes.”
Expected behavior:
- The agent prompts the user to login.
- The agent calls
getMessages. - The MCP server performs OBO and calls Graph and validates the user has Message Center access.
- The agent summarizes results and includes IDs/links when available.
Provide instructions to the agent
To improve the agent’s behavior, you can provide additional instructions the instruction.txt file in your project. For example, you might add:
| |
See the project Message Center Agent - MCP for an example of a completed project, including updated instructions, ai-plugin.json, and starter prompts.
Troubleshooting
Developer Mode
- In Copilot chat, enable Developer Mode with the following prompt:
-developer on
Develop remote is useful in that it gives you a preview of the composed Odata query that will be called against the Microsoft Graph. For example: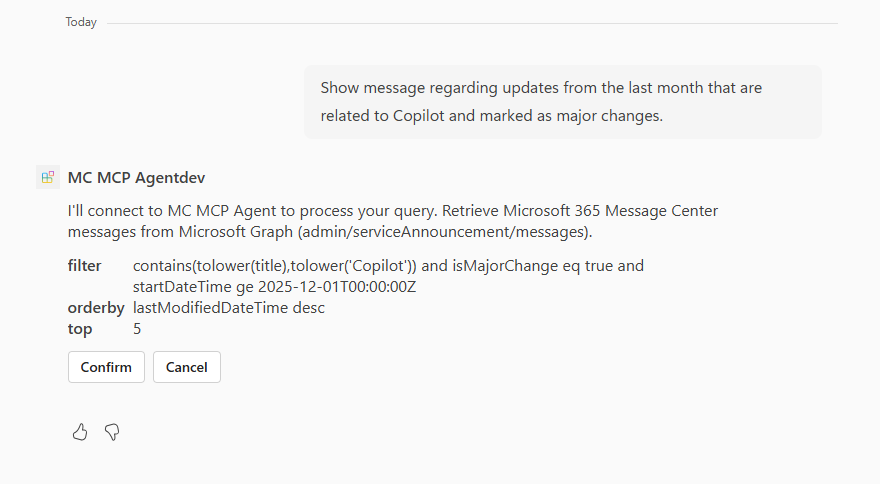
Clicking on ‘Agent debug info’ shows the full request/response payloads exchanged between Copilot Studio and your MCP server. This is useful for debugging issues.
Summary
You now have a declarative agent (built with Microsoft 365 Agents Toolkit) calling an authenticated MCP server end-to-end:
- The agent obtains an MCP API user token
- Calls
POST /mcpwithAuthorization: Bearer <token> - MCP server exchanges via OBO and calls Microsoft Graph
- Returns Message Center results as tool output
In Part 5 of this series, we’ll create a custom agent in Copilot Studio that uses this MCP server to provide Message Center insights.